A hands-on guide to the MCP Apps extension: register a tool that returns an interactive HTML/React UI rendered in a sandboxed iframe inside Claude, ChatGPT, and VS Code.
What it means to build an MCP app
To build an MCP app, you pair a normal MCP tool with a UI resource at a ui:// URI; when the tool runs, the host fetches that HTML and renders it inside a sandboxed iframe in the chat. That single pattern — “MCP App = Tool + UI Resource” — is the entire mental model. The tool keeps behaving like any other Model Context Protocol tool, returning text the model can read, while the resource carries an interactive interface the human can click.
MCP Apps shipped as the first official MCP extension, with the spec and the ext-apps SDK published openly. The extension exists because chat-only agents hit a wall: text is a terrible medium for a color picker, a map, a live dashboard, or a multi-step form. Instead of inventing a proprietary widget format, the extension reuses two primitives MCP already has — tools and resources — and adds a thin convention that links them.
The runtime contract is deliberately small. A tool declares a reference to its UI in metadata. The host sees that reference, fetches the resource, and drops the HTML into a deny-by-default sandboxed iframe rendered in place in the conversation. The iframe and the host then talk over a JSON-RPC 2.0 protocol carried on postMessage, using method names under a ui/ prefix. Data flows from tool to UI when the result arrives, and the UI can call back into the server for more. Today that surface is supported by ChatGPT, Claude, VS Code, and Goose, with Postman and MCPJam usable for testing.
The rest of this guide is a working build: a server that registers a get-time tool plus its ui:// resource, a vanilla TypeScript widget using the App class, and a React version using the useApp hook. By the end you will have rendered a live widget inside a real host.

An MCP App is a tool whose _meta.ui.resourceUri points at a ui:// resource. No new transport, no new auth — just two existing MCP primitives wired together.
How the architecture actually works
The host renders your UI in a sandboxed iframe and exchanges JSON-RPC 2.0 messages with it over postMessage under ui/ methods, while data reaches the widget as the tool result and travels back through proactive tool calls. Understanding this loop before you write code saves hours of confusion about why a value is or is not showing up.
Here is the sequence. The model decides to call your tool. The host invokes it over normal MCP, sees _meta.ui.resourceUri in the tool definition, and fetches the matching resource. That resource is an HTML document served with the MCP App MIME type. The host mounts it in an iframe configured deny-by-default — no network, no inline scripts, nothing your CSP did not explicitly allow. When the tool result lands, the host pushes it into the iframe, where your code receives it through an ontoolresult callback.
From there the widget is a first-class participant. It can call server tools again with callServerTool, send a message into the conversation with sendMessage, write to the host log, open external URLs, and read host context such as theme and safe-area insets. Each of these is a ui/ JSON-RPC call under the hood, which is why the bridge is portable: OpenAI’s Apps SDK rides the exact same surface and layers ChatGPT-only features behind window.openai.
Two design consequences fall out of this. First, your tool’s text output still matters — it is what the model reads, so keep it meaningful even though a human sees the widget. Second, every callServerTool is a round trip through the host to your server and back, so latency is real. Render the first result instantly from the pushed tool result and only call back on explicit user action.
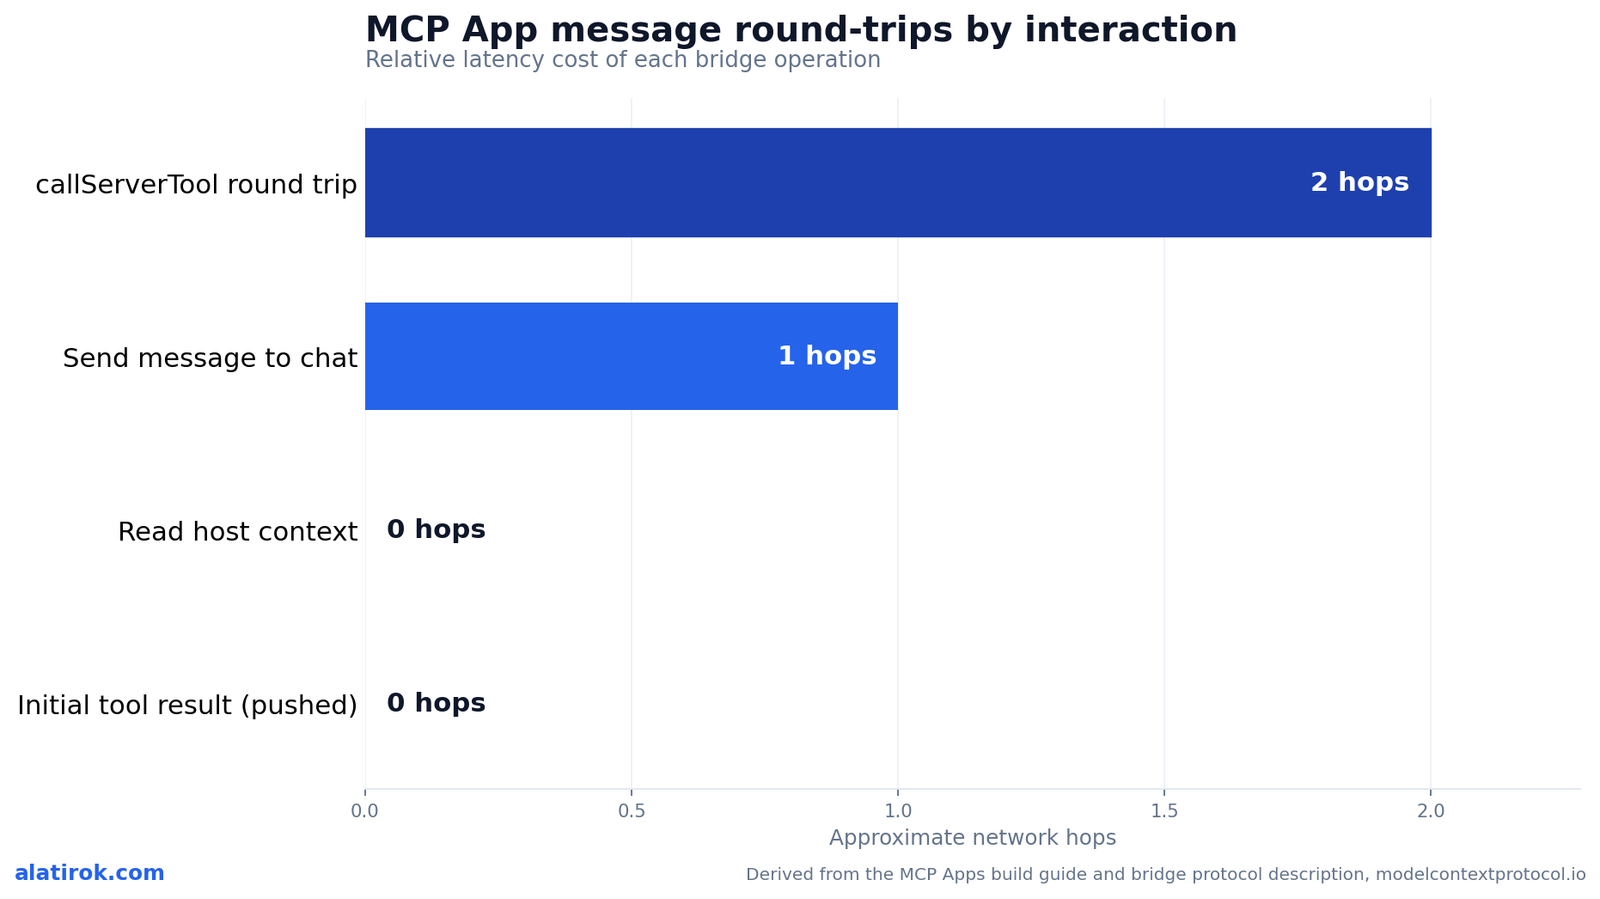
callServerTool is a full host-to-server round trip. Show the first result from ontoolresult immediately and gate further calls behind a button or explicit user intent.
Step 1 — Scaffold the project and install the SDK
Create a project that separates server code from UI code, then install @modelcontextprotocol/ext-apps and @modelcontextprotocol/sdk plus a bundler that emits a single HTML file. The single-file bundle is the shortcut that lets you skip most CSP configuration on your first app.
You need Node.js 18 or higher. A minimal layout has server.ts (the MCP server with the tool and resource), mcp-app.html (the UI entry point), and src/mcp-app.ts (the UI logic). The ext-apps package is dual-purpose: it provides server helpers for registering tools and resources, and the client-side App class your widget uses to talk to the host.
Install the runtime and dev dependencies. The dev set includes vite-plugin-singlefile, which inlines your CSS and JS into one HTML document so the sandboxed iframe has nothing external to fetch — meaning the deny-by-default CSP just works.
If you want to skip the boilerplate entirely, the team ships a create-mcp-app skill. In Claude Code you install it with the plugin marketplace, then ask the agent to build an app and it scaffolds the whole project for you.
# 1. Runtime deps: the SDK + the Apps extension
npm install @modelcontextprotocol/ext-apps @modelcontextprotocol/sdk

# 2. Dev deps: TypeScript, Vite, single-file bundler, Express + CORS, tsx
npm install -D typescript vite vite-plugin-singlefile \
  express cors @types/express @types/cors tsx

# 3. (Optional) install the create-mcp-app skill in Claude Code,
#    which scaffolds server + UI + config for you:
#    /plugin marketplace add modelcontextprotocol/ext-apps
#    /plugin install mcp-apps@modelcontextprotocol-ext-apps
vite.config.ts — bundle everything into one HTML file
import { defineConfig } from "vite";
import { viteSingleFile } from "vite-plugin-singlefile";

export default defineConfig({
  plugins: [viteSingleFile()],
  build: {
    outDir: "dist",
    rollupOptions: { input: process.env.INPUT },
  },
});package.json that sets "type": "module" and a build script of INPUT=mcp-app.html vite build. The INPUT env var tells Vite which HTML entry to inline.Step 2 — Register the tool and the ui:// resource
On the server, call registerAppTool with _meta.ui.resourceUri pointing at a ui:// URI, then call registerAppResource to serve the bundled HTML at that same URI with RESOURCE_MIME_TYPE. These two registrations are the heart of the app; everything else is plumbing to expose the MCP server over HTTP.
The ui:// scheme is what signals to the host that this resource is an MCP App view rather than ordinary data. The path after the scheme is arbitrary — ui://get-time/mcp-app.html is just a convention you choose. The key link is that the tool’s _meta.ui.resourceUri and the resource’s URI are identical strings.
When the host calls get-time, it sees the metadata, fetches the resource, renders the HTML in the iframe, and passes the tool result into the view as it arrives. The tool body itself returns plain content — here, an ISO timestamp as text — which is exactly what the model reads. The human, meanwhile, sees the rendered widget.
Below is the complete server. It uses McpServer from the TypeScript SDK and exposes it over Streamable HTTP through Express on port 3001. Note that registerAppResource reads the bundled dist/mcp-app.html at request time and returns it with the App MIME type.
_meta: { ui: { resourceUri } } on the tool and the matching resourceUri on registerAppResource must be the same string. That pairing is the entire link between tool and UI.
// server.ts
import { McpServer } from "@modelcontextprotocol/sdk/server/mcp.js";
import { StreamableHTTPServerTransport } from "@modelcontextprotocol/sdk/server/streamableHttp.js";
import {
  registerAppTool,
  registerAppResource,
  RESOURCE_MIME_TYPE,
} from "@modelcontextprotocol/ext-apps/server";
import cors from "cors";
import express from "express";
import fs from "node:fs/promises";
import path from "node:path";

const server = new McpServer({ name: "My MCP App Server", version: "1.0.0" });

// The ui:// scheme marks this as an MCP App resource. Path is arbitrary.
const resourceUri = "ui://get-time/mcp-app.html";

// 1) The tool — note _meta.ui.resourceUri links it to the view.
registerAppTool(
  server,
  "get-time",
  {
    title: "Get Time",
    description: "Returns the current server time.",
    inputSchema: {},
    _meta: { ui: { resourceUri } },
  },
  async () => {
    const time = new Date().toISOString();
    return { content: [{ type: "text", text: time }] };
  },
);

// 2) The resource — serves the bundled HTML at the same ui:// URI.
registerAppResource(
  server,
  resourceUri,
  resourceUri,
  { mimeType: RESOURCE_MIME_TYPE },
  async () => {
    const html = await fs.readFile(
      path.join(import.meta.dirname, "dist", "mcp-app.html"),
      "utf-8",
    );
    return {
      contents: [{ uri: resourceUri, mimeType: RESOURCE_MIME_TYPE, text: html }],
    };
  },
);

// Expose the MCP server over Streamable HTTP.
const expressApp = express();
expressApp.use(cors());
expressApp.use(express.json());
expressApp.post("/mcp", async (req, res) => {
  const transport = new StreamableHTTPServerTransport({
    sessionIdGenerator: undefined,
    enableJsonResponse: true,
  });
  res.on("close", () => transport.close());
  await server.connect(transport);
  await transport.handleRequest(req, res, req.body);
});
expressApp.listen(3001, () =>
  console.log("Server listening on http://localhost:3001/mcp"),
);
Step 3 — Build the widget with the App class
In the iframe, instantiate the App class, call app.connect() once, wire app.ontoolresult to render the pushed result, and use app.callServerTool() for user-driven refreshes. This is the vanilla path — no framework — and it shows every moving part of the bridge with nothing hidden.
The HTML entry point is ordinary markup that loads your module. Because you bundled with vite-plugin-singlefile, the built dist/mcp-app.html contains the inlined script, so the sandboxed iframe never reaches out to the network. That is what keeps the deny-by-default CSP happy.
The TypeScript module does four things. It creates an App with a name and version. It calls connect() exactly once at startup. It sets ontoolresult, which fires when the host pushes the tool result into the view — this is your instant first paint. And it adds a button handler that calls callServerTool to fetch a fresh time on demand, demonstrating the proactive round trip.
Keep the round-trip discipline in mind: the ontoolresult handler costs nothing because the data is already in the iframe, while the button’s callServerTool is a full hop to your server. Reach for the latter only when the user explicitly asks for new data.
// src/mcp-app.ts
import { App } from "@modelcontextprotocol/ext-apps";

const serverTimeEl = document.getElementById("server-time")!;
const getTimeBtn = document.getElementById("get-time-btn")!;

const app = new App({ name: "Get Time App", version: "1.0.0" });

// Establish the postMessage bridge with the host. Call once.
app.connect();

// Fires when the host pushes the tool result into the view — instant paint.
app.ontoolresult = (result) => {
  const time = result.content?.find((c) => c.type === "text")?.text;
  serverTimeEl.textContent = time ?? "[ERROR]";
};

// Proactive call: a full round trip to the server. Gate behind user action.
getTimeBtn.addEventListener("click", async () => {
  const result = await app.callServerTool({ name: "get-time", arguments: {} });
  const time = result.content?.find((c) => c.type === "text")?.text;
  serverTimeEl.textContent = time ?? "[ERROR]";
});
mcp-app.html — the UI entry point
Get Time App
Server Time:
Loading...
vite-plugin-singlefile build inlines the module into the final dist/mcp-app.html so there are no external requests from inside the sandbox.Step 4 — Use React with the useApp hook
For a React widget, import useApp from @modelcontextprotocol/ext-apps/react; it returns { app, isConnected, error } and lets you register handlers inside onAppCreated before the connection opens. This is the path most teams will actually use, and it removes the manual connect() lifecycle.
The critical rule: register your event handlers inside onAppCreated, not after render. The hook runs onAppCreated before it calls connect(), so any ontoolresult notification that fires the instant the connection completes is not missed. Setting the handler in a later effect risks dropping the very first result.
Another React-specific gotcha baked into the hook: useApp deliberately does not re-run when its options change, to avoid reconnection loops, and it does not close the App on unmount, to survive React Strict Mode’s double-mount in development. Treat the options as mount-time-only and close the app manually with App.close() if you ever truly need to.
The pattern below stores the tool result in React state from inside onAppCreated, gates rendering on isConnected and error, and triggers a fresh fetch with callServerTool on a button click — the same round-trip discipline as the vanilla version, expressed in idiomatic React.
// src/mcp-app.tsx
import { useState } from "react";
import { useApp } from "@modelcontextprotocol/ext-apps/react";
import type { CallToolResult } from "@modelcontextprotocol/sdk/types.js";

export function GetTimeApp() {
  const [toolResult, setToolResult] = useState<CallToolResult | null>(null);

  const { app, isConnected, error } = useApp({
    appInfo: { name: "Get Time App", version: "1.0.0" },
    capabilities: {},
    // Register handlers BEFORE connect() runs, or you may miss the first result.
    onAppCreated: (app) => {
      app.ontoolresult = async (result) => {
        setToolResult(result);
      };
    },
  });

  if (error) return <div>Error: {error.message}</div>;
  if (!isConnected || !app) return <div>Connecting…</div>;

  const time = toolResult?.content?.find((c) => c.type === "text")?.text;

  return (
    <div>
      <p><strong>Server Time:</strong> <code>{time ?? "Loading…"}</code></p>
      <button
        onClick={async () => {
          const r = await app.callServerTool({ name: "get-time", arguments: {} });
          setToolResult(r);
        }}
      >
        Get Server Time
      </button>
    </div>
  );
}
Step 5 — Test it in a real host
Build the UI, start the server on http://localhost:3001/mcp, then connect it either to the repo’s basic-host for fast iteration or to Claude through a public tunnel. You need a host that supports MCP Apps to actually see the iframe render, since the protocol is host-driven.
For the tightest loop, use the bundled test host. Clone the ext-apps repo, run npm start from examples/basic-host, and point it at your server with the SERVERS environment variable. It gives you a plain interface to pick a tool, call it, and watch the host fetch your resource and render it in a sandboxed iframe — no account or tunnel required.
To test inside Claude, expose your local server with a tunnel such as cloudflared, then add the generated URL as a custom connector under Settings → Connectors → Add custom connector. Custom connectors require a paid Claude plan. The same server also works in ChatGPT via the Apps SDK, in VS Code, and in Goose, because they all speak the same ui:// plus _meta.ui.resourceUri surface.
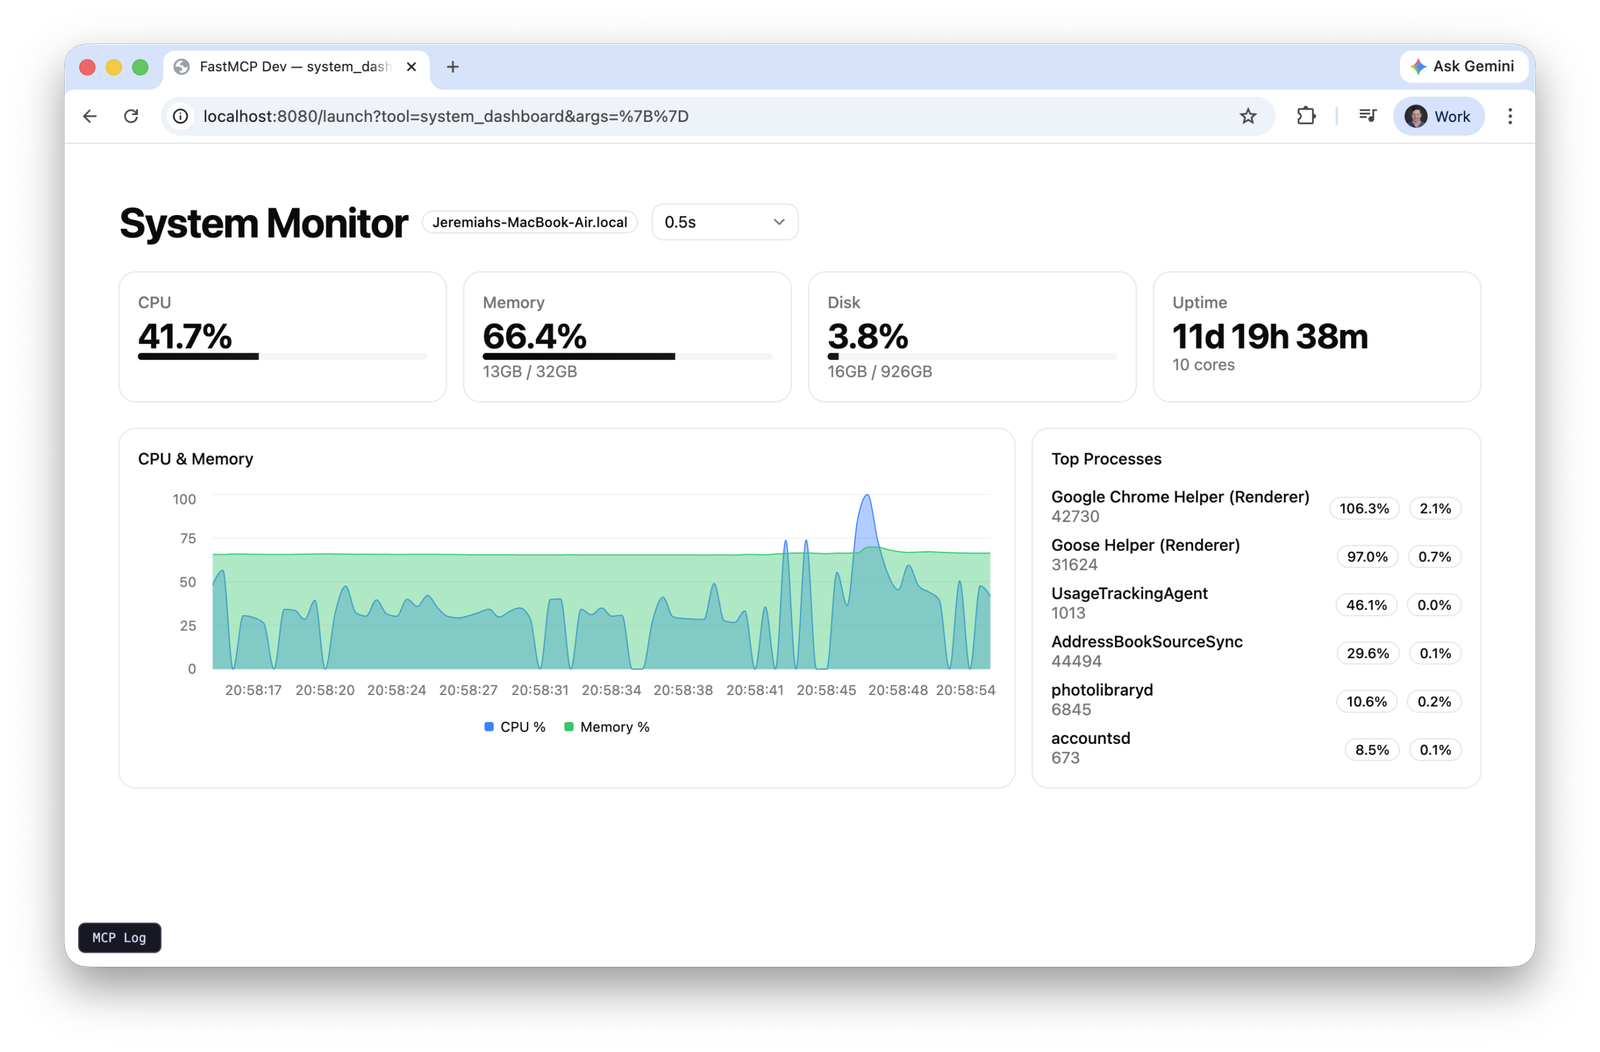
Once you confirm the basics, graduate to the repo’s richer examples. There are 18-plus example servers, including a real-time system-monitor dashboard and a map server that renders a CesiumJS globe, plus starter templates for React, Vue, Svelte, Preact, Solid, and Vanilla JS to match whatever stack you prefer.
Pros
Cons
# Build the single-file UI, then run the server.
npm run build && npm run serve
# -> Server listening on http://localhost:3001/mcp

# Option A: the repo's reference test host (fastest dev loop)
git clone https://github.com/modelcontextprotocol/ext-apps.git
cd ext-apps/examples/basic-host && npm install
SERVERS='["http://localhost:3001/mcp"]' npm start
# -> open http://localhost:8080, pick the tool, watch it render

# Option B: expose to Claude via a public tunnel, then add as a
# custom connector (Settings -> Connectors -> Add custom connector)
npx cloudflared tunnel --url http://localhost:3001
Where MCP Apps fits — and what to watch
A genuinely portable way to give agents a UI
Build an MCP app when the interaction genuinely benefits from pixels — pickers, maps, dashboards, forms — and keep it a plain tool when text suffices. The extension is young but already practical, and its open design means the work you do now is not throwaway vendor-specific code.
The most important strategic point is portability. Because the bridge is a standard JSON-RPC-over-postMessage protocol with ui/ methods, the same server lights up in multiple hosts. OpenAI’s Apps SDK exposes the identical ui:// resource and _meta.ui.resourceUri pattern, then adds ChatGPT-only capabilities behind window.openai. The guidance from OpenAI’s own docs is to start on the MCP Apps bridge by default and treat vendor extensions as additive.
Watch three things as you adopt it. First, version churn: pin @modelcontextprotocol/ext-apps (v1.7.2 was the latest at the time of writing, dated mid-May 2026) and read release notes before bumping. Second, latency: profile your round trips and lean on the pushed tool result. Third, security: respect the deny-by-default CSP rather than fighting it, and never trust input that crosses the iframe boundary.
If you want a head start, the create-mcp-app skill plus the 18-plus example servers in the repo cover most shapes you will need — from a QR-code generator to a CesiumJS globe to a live system monitor. Clone one that resembles your use case and adapt it.
“An MCP App is just a tool whose result happens to be interactive. Get that framing right and the rest is plumbing you already know.”
The core mental model for MCP Apps
Builder’s take
I have shipped enough chat-only agent surfaces to know where they break: the moment a user needs to pick from a list, scrub a timeline, or eyeball a chart, plain text falls apart. MCP Apps is the first standard that fixes this without locking you to one vendor. Here is how I read it after wiring it up.
- The ‘Tool + UI Resource’ split is the whole trick. Your tool stays a normal MCP tool; the UI is just another resource at a ui:// URI. That means an MCP App degrades gracefully — a host that does not support Apps still gets a working text tool.
- Build for the open bridge first, treat window.openai as a bonus. OpenAI’s Apps SDK rides the same ui:// + _meta.ui.resourceUri surface, so the same server can light up in ChatGPT and Claude. Vendor-specific calls belong behind feature checks, not in your core render path.
- The sandboxed iframe with deny-by-default CSP is a feature, not a hurdle. On Cyntr I treat any embedded UI as hostile by default; the MCP Apps sandbox gives me that posture for free. Bundle to a single HTML file with vite-plugin-singlefile and you sidestep most CSP pain on day one.
- callServerTool is where latency lives. Every interaction that hits the server is a round trip through the host. Design the widget to show the first tool result instantly via ontoolresult, then fetch more only on explicit user action.
- This is still draft-stage spec. Pin your ext-apps version, expect ui/ method churn, and keep the tool’s text output meaningful so the model can reason about your app even when the pixels are not in its context window.
Frequently asked questions
An MCP App is a Model Context Protocol tool paired with a UI resource. The tool declares _meta.ui.resourceUri pointing at a ui:// URI, and the host fetches that HTML and renders it in a sandboxed iframe inside the chat. The pattern is summarized as ‘MCP App = Tool + UI Resource’.
At minimum, @modelcontextprotocol/ext-apps (server helpers plus the client App class) and @modelcontextprotocol/sdk. For server HTTP you typically add express and cors, and for bundling the UI into a single HTML file you use vite with vite-plugin-singlefile. React widgets import useApp from @modelcontextprotocol/ext-apps/react.
When the host calls the tool, it renders the linked ui:// resource in a sandboxed iframe and pushes the tool result into it. Your widget receives that result through the ontoolresult callback. The widget can request fresh data by calling app.callServerTool(), which is a full round trip back through the host to your server.
ChatGPT, Claude, VS Code, and Goose support rendering MCP Apps, and Postman and MCPJam are useful for testing. They all speak the same JSON-RPC-over-postMessage bridge using ui/ methods and the ui:// resource scheme, so one server can run across all of them.
Largely yes. OpenAI’s Apps SDK uses the same ui:// resource and _meta.ui.resourceUri pattern and the same postMessage bridge. ChatGPT-specific capabilities such as file handling and modals live behind window.openai. The recommended approach is to build on the MCP Apps bridge first and treat window.openai as additive.
Build and run your server (default http://localhost:3001/mcp), then use the repo’s basic-host by running npm start from examples/basic-host with a SERVERS env var pointing at your server. To test in Claude, tunnel your server with cloudflared and add the public URL as a custom connector (a paid Claude plan is required).
Primary sources
- Build an MCP App (official guide) — Model Context Protocol
- MCP Apps — bringing UI capabilities to MCP clients — Model Context Protocol Blog
- ext-apps repository (spec and SDK) — GitHub — modelcontextprotocol
- @modelcontextprotocol/ext-apps on npm — npm
- useApp React hook reference — MCP Apps API docs
- React integration overview — DeepWiki
- MCP Apps overview — Model Context Protocol
Last updated: June 1, 2026. Related: Agent Infrastructure.